Hello!
Somebody has library or any examples for working with this devices?
XS1-L16A-128-QF124-C10 and lcd K430WQA-V4-F
thank you for help.
lcd library
-
danis
- Member
- Posts: 8
- Joined: Mon May 07, 2018 10:06 am
-
mon2

- XCore Legend
- Posts: 1913
- Joined: Thu Jun 10, 2010 11:43 am
Hi. Have you seen the following application note?
https://www.xmos.com/support/appnotes/AN00168
The LCD display is the same in the example.
https://www.xmos.com/support/appnotes/AN00168
The LCD display is the same in the example.
-
danis
- Member
- Posts: 8
- Joined: Mon May 07, 2018 10:06 am
thank you.
ok, I took it and didn't changed it.
why is it give a mistake?
ok, I took it and didn't changed it.
why is it give a mistake?
-
mon2
- XCore Legend
- Posts: 1913
- Joined: Thu Jun 10, 2010 11:43 am
Fairly confident the code example worked for us when we tested a few years ago. Drew the XMOS logo or something like that on the very dim lcd screen. Are you compiling their project or was something changed? Post your project if customized. Could be how it was imported into the IDE. Will try to compile the same later today.
Last edited by mon2 on Wed May 09, 2018 10:38 am, edited 1 time in total.
-
danis
- Member
- Posts: 8
- Joined: Mon May 07, 2018 10:06 am
I did example code from this document and didn't make changes.
https://www.xmos.com/download/private/A ... rc1%29.pdf
and I added to project file lcd.xc from lcd_lib but it doesn't help.
https://www.xmos.com/download/private/A ... rc1%29.pdf
and I added to project file lcd.xc from lcd_lib but it doesn't help.
-
mon2
- XCore Legend
- Posts: 1913
- Joined: Thu Jun 10, 2010 11:43 am
Hello. Demo compiled fine for me. It must be how the project is being imported into the IDE. Please follow these steps:
1) Launch the xTIMEComposer IDE (just tested with 14.3.2).
2) Create a new workspace. Just used 050918 as a fresh name.
3) Select the EDIT perspective from the LEFT GUI icons from this tool.
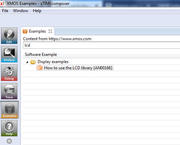
4) Select the EXAMPLES GUI icon on the left side of the tool. Type in "LCD" to quickly locate the same example. Double click the AN00168 example. This will force the tool to import the same into your workspace.
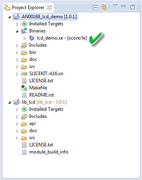
5) Once this project example has imported, select Project (top tab) -> Build All -> errors will appear but the toolchain will then work to resolve these errors and import the required LCD library for you. Then will continue to compile without any errors.
6) Please test and review the posted screens below. Update this thread when ready for closure.
1) Launch the xTIMEComposer IDE (just tested with 14.3.2).
2) Create a new workspace. Just used 050918 as a fresh name.
3) Select the EDIT perspective from the LEFT GUI icons from this tool.
4) Select the EXAMPLES GUI icon on the left side of the tool. Type in "LCD" to quickly locate the same example. Double click the AN00168 example. This will force the tool to import the same into your workspace.
5) Once this project example has imported, select Project (top tab) -> Build All -> errors will appear but the toolchain will then work to resolve these errors and import the required LCD library for you. Then will continue to compile without any errors.
6) Please test and review the posted screens below. Update this thread when ready for closure.
-
danis
- Member
- Posts: 8
- Joined: Mon May 07, 2018 10:06 am
thank you very much!
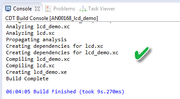
compiling has been successful!
but running isn't working.
it exactly work with XS1-L16A-128-QF124-C10?
compiling has been successful!
but running isn't working.
it exactly work with XS1-L16A-128-QF124-C10?
-
mon2
- XCore Legend
- Posts: 1913
- Joined: Thu Jun 10, 2010 11:43 am
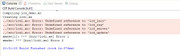
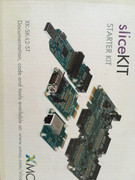
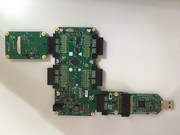
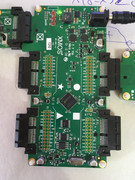
Which XMOS kit do you have? Can you take a quick pic and post it? The tool is stating that the small daughter board (JTAG) has been found on your system.
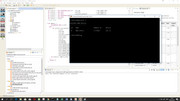
Enter the xTIMEComposer Console Mode -> then type in:
xrun -l ; that is a "L" as in Larry
and post your results. This test will confirm if the connected XMOS kit is being detected.
Enter the xTIMEComposer Console Mode -> then type in:
xrun -l ; that is a "L" as in Larry
and post your results. This test will confirm if the connected XMOS kit is being detected.
You do not have the required permissions to view the files attached to this post.
-
danis
- Member
- Posts: 8
- Joined: Mon May 07, 2018 10:06 am
-
mon2
- XCore Legend
- Posts: 1913
- Joined: Thu Jun 10, 2010 11:43 am
The output from the console mode is positive [0..1] = Dual Tile processor found. You can remove the XTAG board away from the kit and re-run and the results should change.
Try to remove the USB cable and re-dock onto another USB connector (black insulator = USB 2.0 are recommended if available). You could try to reinstall the toolchain and be sure nothing was skipped during the installation. Any virus program running that may have blocked the full installation?
Also, is this the first project you are testing with this kit or have you validated a simple LED blinky program or similar to confirm the toolchain is installed ok?